Wednesday, October 23, 2013

Grilled Cheese Pull-Aparts


I consider myself to be a pretty decent cook. I'm certainly no gourmet chef, but I do know my way around the kitchen. I also make mistakes. A lot of mistakes. (Thankfully, I have a husband who will eat anything!) My mistakes make me a better cook. It forces me to improvise, and then I know not to make the same mistake next time.

One weekend, when James and his dad were working our window frames (that's a post for another day), I decided to try something new for lunch. Here's the first lesson that I learned: Don't make something new when you have company. You will screw it up, and then you will look like a bad cook. I mean, yeah, I make mistakes. But I don't want people to know that I make mistakes! ;) Anyhoo, I made these grilled cheese pull-aparts that have been floating around on Pinterest. They're pretty decent! Everyone seemed to like them. But I definitely took the long way around on this quick, easy recipe, because guess what? I screwed it up. But I improvised.

It goes a little something like this...

I used:
  • block of cheese
  • tube of refrigerated biscuit dough (I used Grands Flakey Layers)
  • 2 tablespoons of butter
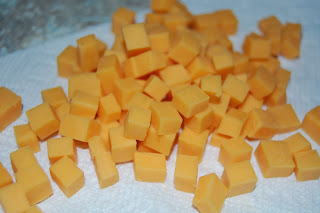
First, I cut up a block of cheese into little cubes. You could probably use shredded cheese, but I didn't. No particular reason, I just didn't. And you can use whatever kind of cheese you like. I made two different types: One with Colby and one with American. Next time I'll just use Colby, because the American didn't melt as well as I'd hoped (lesson #2), but the Colby worked perfectly. The recipe that I used for inspiration (linked above) called for Velveeta. I generally don't like to use Velveeta, so I don't when there are perfectly good, and just as easy, alternatives.


Then I flattened the each individual hunk of biscuit dough and piled some cheese cubes on top. I have no measurements for this. I like cheese, so I used a lot.


Then I stretched the dough around the cheese and pinched it shut at the top.


So far, so good...

The Pinterest recipe called for 1/2 cup of butter. That's an entire stick, and entirely too much butter (yes, there is such a thing as too much butter, contrary to what Paula Deen might think). So I cut it down to 2 tablespoons. Really, you just need it to coat the bottom of your 9-inch round cake pan, so there is no need to use a whole stick. Anyway, melt it and swish it around until it covers the bottom of the pan.


Then I put the biscuits in the pan, seam side down.


Then I popped it in the oven according to the directions on the package of biscuit dough, which was 350 degrees for 14-17 minutes. I started with 14 minutes. When I took them out they looked delicious! Nice golden brown, just like they were supposed to look!


So far, so... not good.

I took one out to put on a plate, and they were doughy in the places where the biscuits were touching each other (lesson #3). Not just a little doughy, but full-on stringy, sticky doughy. Crap.

So I took them out of the pan one by one, and placed them on a cookie sheet with lots of room in between each biscuit. Then I put it back in the oven for another 5 minutes, and crossed my fingers that the tops and bottoms wouldn't burn while the rest of the dough cooked through.


It worked! They turned out great! But for the love of Pete, don't use a 9 inch round cake pan. Save yourself the trouble and just use a cookie sheet from the get-go.

I made some nice hot tomato soup to go with it. It was the perfect lunch for a rainy fall day!


Monday, October 21, 2013

Painting Cabinets

Ever since I started reading home decorating/renovating blogs, I've been fascinated with how wonderful painted cabinets can look. I say can look, because I've also seen some not-so-good cabinet paint jobs. So I was hesitant to do this project myself. If I screwed it up and it looked bad, what would my other options be? A whole new vanity? Then we'd need a new counter top. Then we'd be spending more cash than we wanted to. But I decided to go for it. It didn't look very hard. I thought I could do it. And I'm very happy to report that I was right! Seriously you guys, anyone can do this. It just takes a little time and effort.

Before

Here's what you need:
  • Screwdriver
  • Sandpaper
  • Paint and painting supplies
  • Adhesion primer
Step 1: Take all the doors off and the drawers out. Then remove the hardware. If you want to change the placement of the hardware, this is when you would putty those holes using wood putty. Also, inspect the doors for any chips or gouges and putty those, too. Let the putty dry completely. Thankfully, our cabinets were in pretty good condition, so we didn't need to do any puttying. I did, however, need to glue the corner on one of the drawers because it was coming apart. Dang, those corner clamps come in handy!


Step 2: Take the doors/drawers outside and sand the crap out of them. Well, actually, you just need to do a light sanding so the primer will stick better. Then go back inside and lightly sand the surface of the cabinet frame.
Note: I did the majority of this project after the kids went to bed, so that's why it's dark outside. My neighbors probably thought I was crazy, sanding cabinets at 10:00 PM. Whatever. They don't know my life.

Step 3: Brush everything off with a stiff brush or a broom. I would like to take this opportunity to show off my adorable little walrus hand broom, because that's what I used to brush the sawdust off. Isn't it cute! The snout comes off, that's the brush part, and the head is the dust pan. I love it.

Step 4: Prime it. You want to get some adhesion primer. It's made to be used on smooth surfaces and it sticks really well. It's pretty thick, but works like a charm. I got mine at Lowe's. Most likely, you'll only need one coat of this. That's all I did. It doesn't have to look even, you're just using it as a base for your paint, something for it to stick to.

Step 5: Paint it. You want a high gloss paint for this. I used Sherwin Williams All Surface Enamel in a high gloss finish. The color is Black Bean. Two coats did the trick for me, and it's a super dark color being painted on white primer, so I can't imagine that you would need to do more than two coats.

Step 6: This is the hard part. You should wait as long as you can to put the doors back on. Latex paint take a month to fully cure. We waited a week, and then we tried to leave the doors/drawers propped open as much as we could to prevent them from sticking.

Step 7: Install the hardware before you put the doors back on.

Step 8: Hang those doors back on! Then you're done!

We have no natural night in our bathroom, so I had a hard time getting a picture that showed the true color. This is pretty close, but it doesn't look quite as shiny in real life. I am so happy with the results! And it was a lot easier than I thought it would be.


Sunday, October 20, 2013

Framing a Bathroom Mirror

Okay, so it's been a few months since the bathroom mini-makeover, and I still haven't posted about the details. I said I would, and I like to keep my word, so here it is. Hey, I never said when I would post about the details, I just said that I would do it. And I am. So there.

Our bathroom makeover was easy. A little sand paper, elbow grease, and paint and just about anyone could pull it off. I mean, this project was MY brain child and if I can do it, so can you. That being said, building a mirror frame is going to be difficult for the average Joe to do if he doesn't have (or know someone who can lend him) the right tools. Namely some sort of electric saw, like a miter saw or, as we used, a radial arm saw. It is also helpful to have a corner clamp to hold the corners together while the wood glue is drying.

Here's what else you need:
  • Trim
  • Wood glue (paintable)
  • Liquid nails
  • Paint
  • Corner clamp (not necessary, but helpful)
That's it!

About the trim: You can use whatever kind you like. Just pick what will give you the look you're going for. We used chair rail, but you could use window casing or whatever. I would recommend MDF, which stands for medium density fiberboard. It's still wood (not that cheap foam crap), but it's like composite. It's lighter than the solid stuff, so it will work better for this type of project. Also, I like to get my MDF pre-primed. It lets me skip the priming step, so it's less work later.

Here's how you do it.

Step 1: This is the hardest part (and it's not even really that hard). You have to measure the height and width of your mirror and decide how big you want your frame to be. We made it so the frame is slightly bigger than the mirror, so it hangs off the sides and top just a little bit. You don't want too much overhang or you won't have enough mirror to attach the frame to. Use your best judgement. Then you need to cut the trim to fit. Make sure you have 45 degree angles on all the ends, so they will fit together.


Step 2: Use the wood glue to put the pieces of the trim together to form the frame. This is where the corner clamp will come in handy. Use it to clamp the corners together and let it sit overnight.


Step 3: Once the wood glue is dry, remove the clamps. Put some wood putty to fill any gaps you may have in the corners. You could also use caulk for this, but whatever you use, make sure it's paintable.

Step 4: Once the putty is dry, it's painting time! We went with a deep, rich brown - Black Bean by Sherwin Williams. I wanted an I'm-not-sure-if-this-is-black-or-brown type of color, and this certainly fits the bill! I only needed to do two coats. Once the front is dry, flip it over and paint about 1/3 of the way from the edge on each side (the inside and the outside). When you put the frame up, the mirror is going to reflect a little of the back side of the frame, so you want it to be the same color as the front or it will look funny. (I forgot to take a picture of it after it was painted. My bad.)

Step 5: It's time to put this baby up! We have a pretty big mirror, so we used a whole tube of Liquid Nails. Just apply it to the back where the frame will touch the mirror.

Now you will need to either tape it to the wall for 30 minutes, or sit and hold it yourself. We chose to do the latter, because we had just painted the bathroom walls and the frame, and I didn't want to risk the tape pulling any paint off when we removed it. We stood there, holding it up for 30 minutes. The entire time, we were admiring our handy work.

What a huge difference! In my opinion, this project made the single biggest change in the bathroom.


Wednesday, August 14, 2013

The Reveal: Mini Bathroom Makeover

Alright, so the last time I posted, I talked about our plan for our mini bathroom makeover. Now here we are 10 days later, and the makeover is complete! This really could be a weekend project, but I only had the opportunity to work on it when the kiddos were either napping or in bed for the night (except for Sunday night when we painted the walls, my parents had the boys overnight so we could do all the painting at once) so it took us a little longer than that. I have to say, I'm pretty thrilled with the results!

So here it is, the big reveal!

Before:


After!


I am so proud of us!

So here's a list of the stuff we did:
  • Painted the vanity
  • Changed the vanity hardware
  • Framed the mirror
  • Painted the trim
  • Replaced the outlet with a GFI outlet
  • Replaced light switchs and plate
  • Replaced air vent cover
  • Replaced the door stopper (you know, the little springy thing that kids like to play with)
  • Scraped off the texture on walls
  • Painted the walls
  • New shower curtain
  • New towel bar (we also hung it a bit higher than it was before)
I know I said we were going to replace the closet door, but we haven't done that yet. We might try to do it this weekend, but I'm not sure if I want to take that on just yet since I have to go back to work on Monday. We'll see what happens. I will certainly post pics after we do it, whenever that is. In fact, we will be replacing all the doors in the entire house at some point, hopefully within the next year or so. They're really eye sores right now.

James and I have both caught each other stopped in the middle of the hallway (on our way to the bedroom or somewhere) staring into the bathroom. LOL! It feels like a totally different room! I love the white trim, I love the frame for the mirror, I love the color I chose for the vanity (I was nervous about that one). I am so happy we did this!

And in case anyone was wondering, the wall color is Sherwin Williams Upward. I used their Duration line in a satin finish. The vanity is Sherwin Williams Black Bean. I used their All Surface Enamel in a high gloss finish. And the Trim is Benjamin Moore Simply White (matched to Sherwin Williams - it 's their trim and door line, can't remember what it's called exactly, in a semi-gloss finish). All are latex paints. I don't do oil based.

I'll make posts later with more detail of each individual project, but I was just so excited to show before/after pics that I couldn't wait!

Here's some more!

Vanity before/after:


I already showed the following pictures at the beginning, but I like side-by-sides of before/after pics. I think you can really tell the difference more when they're next to each other.


 I really wanted a before/after pic of the mirror, but half way through the project I realized I forgot to take a before picture of just the mirror. So this is really more of a during/after picture. But WOW, what a difference a frame makes!


And since we're talking about bathroom changes, since we moved in we've already replaced both light fixtures in the bathroom, and changed the light/fan combo to be on two separate switches instead of one. I'm pretty sure the previous owners wouldn't even recognize this bathroom. And it's mostly just superficial stuff, not a huge remodel! It was totally worth the time and effort!


***UPDATE***
Click HERE to see how we framed the mirror.
Click HERE to see how I painted the vanity.

Sunday, August 4, 2013

The Plan: Mini Bathroom Makeover

I've been totally into planning updates for our house lately. I've been checking out a lot of home decorating/renovating blogs, and I've found it to be very inspirational. My favorite is a blog called Young House Love. It's a young couple blogging about all the updates they've done to their home. Since starting the blog, they've owned three homes and they've done SO much work in all of them. I am totally in awe of the vision they have. They can look at a room and just know what would make it look 10x better. I wish I had that.

Anyhoo, like I said, it's been very inspirational for me, and now I have a long list of things I want to get done around the house. But making a list is infinitely easier than actually doing the things on that list. So this coming week, I'm going to start doing. And I'm starting with the bathroom.


Ok, so it doesn't look that bad in the picture. But I think it really needs a facelift. At first, I just wanted to paint it. We decided on a color called Upward by Sherwin Williams.We need a light color because we have no natural light in our bathroom, and I don't want it to feel like a dark dungeon.


Upward by Sherwin Williams

Before I continue, I have to take a moment to stress how incredibly terrible the previous owners of this house were at painting. I like to call them the "One Coat Wonders" because they obviously felt  that one coat of paint was enough, no matter how it looked afterward. They also must really have had something against painting tape, which is fine if you can take your time (they didn't) and have a steady hand (they didn't). Needless to say, the trim in our entire house is covered in paint. They literally just slopped the stuff on the walls without regard to anything they might get paint on, the trim, the floor, the counters, whatever.

See, I told you it was bad.

So I'm going to be painting the trim in the entire house white (I've always had a thing for white trim)  and I might as well start with the bathroom, since I'll be painting in there anyway. And if I'm painting the trim white, then we'll need to get new doors that are white. So we decided to just replace the closet door and leave the entry door for the time being (until we decide to replace all the doors, which is on the list for the future). 

Then I mentioned to James how I thought a nice frame around the plain ol' builders grade mirror would look great, and he figured he could probably make one pretty easily. So we searched a bit and found a few good tutorials on how to do it.


Then I took a good look at the vanity, and I said to myself, "Self, this vanity needs new hardware STAT!" But you see, it has those pesky little plates attached to the doors/drawers under the handles that were oh so popular in the 70's. And for some crazy reason that I can't comprehend, the builders stained the cupboards after they put those plates on. So there is no stain under it. So if I want new hardware, I need to either try to match the stain, or paint it a different color. So I'm thinking I'll paint it a nice deep brown, and paint the mirror frame to match. Sounds like a "fun" little weekend project. (I really hope you can sense my sarcasm.) 

In my head, it looks something like this, only less black and more brown:


And that, my friends, is how a simple idea to paint the bathroom snowballs into this list:
  • Paint the walls
  • Paint the trim
  • Paint the vanity
  • Frame the mirror
  • Change vanity hardware
  • New door for linen closet
Wish me luck!


Friday, August 2, 2013

Houston, We Have A Patio!

You guys, I am SO pumped to be able to finally write this post!

First of all, I am going to apologize in advance for my overuse of caps and exclamation points.

Now, if you are friends with me on Facebook, then odds are you know that we were working on building our patio A LOT about a month ago. We are really stupid and cheap and decided to do all the work ourselves. And let me tell you, it SUUUUUCKED! James took a few days off of work, so we completed most of the work during that time. We had already done the digging prior to that, so we "only" had to fill it with gravel, tamp it, fill it with sand, screed and tamp it, then lay the pavers, tamp again, fill cracks with sand, tamp again, then fill the cracks with sand again. I don't know WHAT I was thinking when I thought we could do all that in only a few days. It was brutal. Thank goodness for my parents! My dad helped so much with the work and letting us borrow his pickup, and my mom was the designated babysitter so I could help with the patio. We wouldn't have been able to do it without them.

Anyway, at the end of James's third day off, the patio was complete. But we still had a giant pile of dirt in the back yard from what we had dug up, and we needed to level out the area between the pavers and the lawn with that dirt, so I didn't want to get all camera happy and post a picture until that was done.

Well my friends, as of today it's DONE! James just finished filling in the remaining empty space with dirt and leveling out the ground around it. He also tossed some grass seed on top and I watered it. I mean, we still have the giant pile of dirt, but we're working on getting rid of that. I'm hoping I'll find someone who wants it, who will just come a take it away. We'll see what happens. But at any rate, the patio is now picture worthy!


Now I just need some patio furniture, which I'm hoping to find on clearance sometime soon (did I mention I'm cheap?). We have some nice folding patio chairs, and a hand-me-down plastic table, but I think my beautiful patio deserves a matching set. :)
 
And here's the pile o' dirt I mentioned earlier.


You guys, I am SO happy to be done with this project. You have NO idea. Now, on to the mini bathroom makeover! (Be on the lookout for a post about that soon!)


Sunday, July 28, 2013

Storage for Kids' School Projects

Well, It's almost that time. School time, that is. This summer has flown by, and now we find ourselves starting to think about things like school supplies and morning routines. This is actually the first year that I've had to join in the school supply madness, as Isaac is starting preschool at St. Michael's this fall, and I'm happy to report that our back-to-school shopping is DONE!

So I started thinking about what I'm going to do with all the cute little paintings and drawings and other school projects that the kids are going to start coming home with, as well as report cards and certificates and stuff, and decided that I needed some kind of storage solution to keep it all organized. I already have some little projects that have come home from daycare over the past few years, and they are anything but organized. I found this idea on Pinterest and decided to do something similar.

So here is what I spent my morning doing (all before 9:00 AM, go me!).

 
The kiddos saw me taking pictures and wanted to get in on the action. They're so darn cute, I just couldn't deny them. (And Alex is debuting his new haircut in this picture.)

 
I got the file storage cases at Target, and the hanging files and sticky foam letters at Walmart. This is not a terribly expensive project. I got everything I needed for this project for about $20.
 
Here's what the inside looks like:


I chose to use only one file for 0-3 years old because I don't have a whole lot of stuff to put in there for those ages. After that, I did one tab for every grade, preschool to 8th grade. I also put grades 9-12 in one tab titled "High School". I did this because it worked with the amount of file folders I had, and I'm not sure that parents save a lot of high school stuff anyway. But the beautiful thing is that I can always change it later.
 
And the thing that inspired me to start this project was Isaac's very first birthday interview! It's so cute, I had to share. I can't remember how I found it, but of course, I pinned it (link). I went to Office Max and had it laminated. I plan to do this interview for each of my kiddos every year on their birthday. (I took two pictures so I could zoom in more to make it easier to read.) My favorites are #9 and #20, lol!